Overview
StarMeter is our client experience survey tool used to monitor, measure, and respond as we deliver and improve upon our client experiences. Clients access a short experience survey by scanning QR codes in our office and then rate their overall satisfaction with their experience. StarMeter provides continuous and real-time client feedback that is used to deepen relationships, as well as identify and take action on opportunities to improve.
Note: New alerts must be worked within 48 hours. Alerts are be moved to overdue if not worked within 48 hours. Once overdue, alerts are automatically escalated if now worked within 24 hours. See StarMeter Alerts for more information.
Additional questions about StarMeter can be sent to _Star Meter Support.
Log on Instructions
- You will receive an email from Medallia with instructions for accessing the system for the first time and setting your password.
- Click the link and complete the instructions to set up your account and to create a password.
Sample email
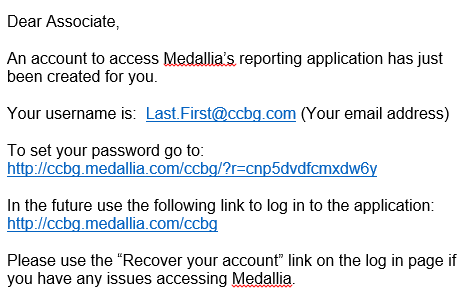
In the future click here to log in to the application:
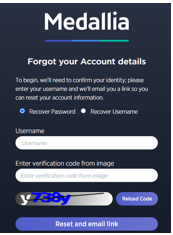
Please use the “Recover your account” link on the log in screen if you have any issues accessing Medallia.
Once you have an account established, use the following link to access the StarMeter application www.ccbg.medallia.com/ccbg/pages.
Best Practice: Bookmark the link for easy access in the future.Setting / Changing User Role
To set or change your user role, do the following:
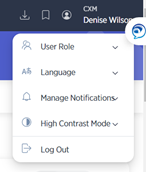
- Click on your name located in the top right corner of the screen.
- Use the drop-down menu to select the appropriate user role.
- Only the roles you have access to are populated
- Client Service Experience Manager (CXM's) and Lead Tellers select CXM.
- Regional Experience Managers (RXM's), select RXM.
Setting Filters
Filters allow you to slice and dice information in multiple ways. Filters are available on almost every window of StarMeter. The filter selections vary slightly depending on where you are in the system.
The procedures listed below are an example of how to navigate filters from My Branch > Overview. Filters on other screens vary.
- Locate Show Filters on the upper right side of the screen.

- Click the Time Period drop-down menu to choose the time period for survey results.
- CXMs and LTs have access to select their office.
- Regional Experience Managers (RXM's) have access to filters for office, city, state, and region.
- All users have access to additional filters which allow you to refine results in the following ways:
- Problem area
- Action taken
- Share this with...
- Is this a complaint
- Record type
- Expectation exceeded
- Spoke with the video banker
- The primary reason for the visit
- Issues with debit card
- Survey language
- Note: each additional filter has sub-options that allow you to refine results further
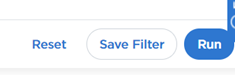
- To apply the filters to your dashboard view, click Run.
- To go back to the original filters, click Reset.
- To save commonly used filter combinations for quick access, click Save Filter.