Overview
Temporary checks are printed in the office. Clients can request temporary checks when opening a new checking account or when a check order from Harland Clarke has not yet been received. Temporary checks can not be issued for savings accounts.
New account consumer and business clients can receive up to 4 temporary checks (1 sheet) free of charge. The starting check number for temporary checks must be 101 and checks must be issued as the account is titled.
Existing consumer and business clients can have 12 checks (3 sheets) of temporary checks printed in the office for a fee of $5.00. Temporary checks must not be issued with duplicate numbers. A temporary check inquiry must be conducted to ensure that additional temporary checks printed do not duplicate previous check numbers issued. See the Temporary Check Inquiry tab for more information.
Temporary Check Inquiry
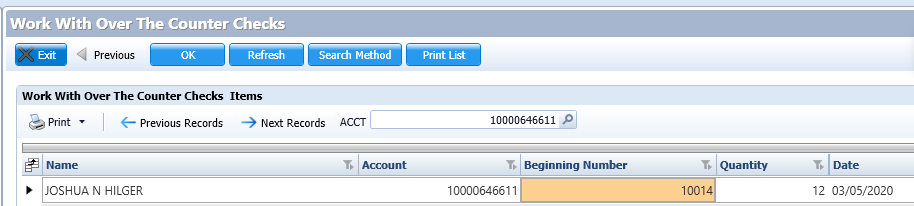
Conduct a temporary check inquiry to ensure that additional temporary checks printed in the office do not duplicate previous check numbers issued to date.To perform a temporary check inquiry, do the following:
- In Xperience > Teller Menus > OTC CHECKS-CHECKING ACCTS > Temp Check- DDA Only/No Savings.

- In the Account Criteria field enter the client's account number and account type.
- Click OK.
- Select the client's name from the Work with Persons Items list.
- Click Select.
- Review the beginning number column to determine the last beginning check number used.
- Add the quantity to the last beginning check number used to determine the beginning check number for the current request for temporary checks. For example: Beginning Number 10014 + Quantity 12 = 10026. Use 10027 as the new beginning number for the current temporary check request.
Printing Temporary Checks
To print temporary checks for a client, do the following:
- Verify the identity of the client by using one of the following:
- In Xperience > Teller > OTC CHECKS-CHECKING ACCTS > Temp Check- DDA Only/No Savings.

- To locate the client, enter one of the following:
- Account number
- Tax Identification Number (TIN)
- Short name
- Last name, first name
- Click the client name from the list provided.
- Click Select.
- The OTCCHK - Counter Check Type Information page displays.
- Do not change the client’s name on the first line.
- Ensure the address is correct and edit if required. Note: This does not change the address on the Client Information File (CIF).
- If the client wants a phone number on the checks, in the Phone field enter the phone number. Note: Do not change the following two fields:
- Date – prefills with the current date
- Account – prefills the account number selected
- In the Beginning Number field, enter 101 for new clients or the beginning number as determined in your temporary check inquiry.
- In the Quantity field, enter the number of checks to print. Note: Checks print 4 to a page.
- Put the temporary check paper stock in the designated printer for printing temporary checks.
- Click OK.
- Give the printed checks to the client.

OTCCHECKS - Synergy Report
A report is available in Synergy for review previous days issued checks. To view the report do the following:- In Xperience > Synergy > Find Reports, select the following criteria:
- Institution: 02
- Application: QRY
- Report: OTCCHECKS
- Date: Select Specific Dates
- Date: Select the individual date
- Click Search.

The report contains the following information:
- User ID – Associate that created the pre-printed temporary checks
- Date Printed
- Account Number
- First Name and Last Name printed on the temporary checks